# Angular # What is Angular? ### How Angular Differs from Traditional Websites
Traditional WebsitesAngular
Traditional Websites have a browser request an HTML page from a website from a serverAngular applications are designed to send the entire site upon request, so there are no further requests made to the server. The has the advantage of being super fast and responsive
Traditional Websites would process a template (eg. JSP) and Data to create the HTML pageAngular is already going to have that pages deigned even if the Data appears later The data is requested from the server using an architecture such as REST
- To build a Angular website requires NodeJS, but running it requires no special software - Note that version 1 of Angular was was called AngularJS and written in JS, whereas every version after 2 was written in typescript ### Setting Up a Project - The CLI tool for angular is **ng** and it can be installed via node - npm install -g @angular/cli - Create a project: - *ng new* - Run a project from the root directory: - *npm start* OR *npm serve* - Default port is 4200 # Angular Architecture - An Angular Component can be thought of as part of a web page - It's a combination of HTML and code, although it could consist of only one - **Generally it's a piece of display with functionality** - We can then reuse components, such as a menu component, across the site. [![](https://bookstack.mitchellhenschel.com/uploads/images/gallery/2022-04/scaled-1680-/image-1650152316745.png)](https://bookstack.mitchellhenschel.com/uploads/images/gallery/2022-04/image-1650152316745.png) ## Component File Structure - Within a project components are broken down into folder, which usually have 4 parts: - HTML - .html - contains layout - CSS - .css/.sass/.ccss/.less - stylesheets for the component - Class - .ts - typescript file backing HTML - Spec- .spec.ts - A second typescript file for unit testing (created by default but can be deleted) ## A Code Snippet ``` import {Component, EventEmitter, Output} from '@angular/core'; @Component({ selector: 'app-header', templateUrl: './header.component.html', styleUrls: ['./header.component.css'] }) export class HeaderComponent { constructor() { } @Output() pageRequested = new EventEmitter(); onChangePage(page: number): void { console.log("page " + page + "clicked"); this.pageRequested.emit(page); } } ``` Not a lot to discuss here since the class above is very similar to java. Just a couple key differences: - Annotations are called *Decorators* in Angular - The HTML tag will be named after the 'selector' field - Below that templateUrl and styleUrl give the locations of the HTML and CSS files, respectively - `export` is the equivalent of `public` A tag for this component in HTML would look like: `` - Angular-Cli can generate components automatically - `ng generate component ` OR `ng g c ` - The app.component.html contain all the components in the application - index.html is always loaded first and only contains the reference to <app-root> - **Angular Does Not Assemble the HTML.** All of the code in the application is compiled into JS files, which is then read by the browser to create the complete HTML files - Check them out by viewing the source of the webpage - By default in Angular, the URL does not change on page nagivation, but this can be easily changed - This also means you can't use the 'Back' button on the browser as there is no history - There is also a file called app.module.ts which tells the application where to find components - CLI tool updates this automatically, so only worry about this if you are creating the file structure manaully ## Template Variables - Template Interpolation means we can have a variable in our TypeScript file that can be referenced from the HTML - Use `{{ varName }}` for variables and `((methodName))` for methods and `[attName]` for attributes in the HTML - Code can be bound to events, such as a button press ```` - While these might have the same effect, the ngIf method also changes the source code ## Component Interaction - It is possible to read child properties from the parent's class file. - Very similar to Java inheritance, this is a one-way interaction - It is also possible to write to child class attributes from HTML [![](https://bookstack.mitchellhenschel.com/uploads/images/gallery/2022-04/scaled-1680-/image-1650152364551.png)](https://bookstack.mitchellhenschel.com/uploads/images/gallery/2022-04/image-1650152364551.png) - The app component is the parent of all pages - The child component can send a message to the parent component which can listen for certian events ## Services and Dependency Injection - You can create a single instance of a class that can be accessed by any component along with its functions, in Angular this is called a *Service* - The only Special feature about Services is that once instantiated it will be automatically injected into any classes in the Application using dependency injection - Generate a Service with: `ng generate service ` or `ng g s ` - Note: AngularCLI will automatically add 'service' to the end of the name - The `@Injectable` decorator allows the class to be injected - One could configure the injectable to only allow access from certian classes, but this is an advanced feature - To inject a Service, you must add the service to the injected class constructor parameters ## The Observer Design Pattern - As a general rule you should not be referencing services within the HTML - What is better is to create a local variable in the component ``` ngOnInit(): void { // This will automatically update if the books array is changes. // Because it is a referenced variable this.books = this.dataService.books; // This will not update automatically if the books array changes. // It is a local variable. this.numBooksByMe = this.books.filter( it => it.author === 'Me' ).length; } ``` - To overcome the above issue, we can use the Observer Design Pattern - This method is used extensively in the code of Angular itself - The idea is fairly simple: 1. Define an object of type Observable. - This is a special object type which can send out notifications (or events) - We can write code to trigger these events 2. Define objects to observe these observable objects, called observers - This is done within the data service - The Subject object is nearly identical to EventEmitter, except it comes from the rxjs package, a reactive programming library included in Angular. - EventEmitter is a wrapper of Subject - The recomendation is always to use EventEmitter as the observable ``` this.dataService.bookAddedEvent.subscribe( // first var: the incoming data (newBook) => { if (newBook.author === 'Me') { this.numBooksByMe++; } }, // second var: error handling (error) => { console.log('An error occurred:', error); }, // Optional complete event always takes no parameters () => { // complete event } ); ``` - If an error is thrown the service is unsubscribed from the event, you need to add special code in the error handler to perisit the connection - You should also unsubscribe observers when they are finished, or else a memory leak may occur. - Use the `OnDestroy` method - To inject an Interface there is an extra step in app.module.ts: ``` @NgModule({ declarations: [ AppComponent, Page1Component, HeaderComponent, Page2Component, Page3Component, FooterComponent ], imports: [ BrowserModule ], // When provided with use providers: [ {provide : 'DataServiceInterface' , useClass : DataService} ], bootstrap: [AppComponent] }) export class AppModule { } ``` - Tests don't use the app.module.ts so you'll have to add it into tests where applicable. Except in tests you use `useExisting` rather than `useClass` # A Note on .gitignore By default, Github will exclude /node\_modules in the .gitignore file. This is good because this folder can be very large, and the contents can be easily obtained when opening an Angular project. However, if using Continous Integration, the build will fail without these files. So including these files should be concidered if using a workflow which automatically deploys. # TypeScript ## Intro to TypeScript - TypeScript is a superset of JavaScript with added features Java Devs will recongnize ### TS Data Types (primative types are lower case) - number - equivalent to a Java double, this is used to decalare any type of number - boolean - same as Java - string - same as Java - symbol - Very rarely used - null - variable has not been given a valid value - undefined - variable has not been initalized - Array - Similar to Java List, they can be any size and grow and shrink over time, and you can use generics as you would in Java ``` exploringArrays() { const myArray1 = new Array(); const myArray2: number[] = [1, 2, 3, 4]; } ``` - Tuple - Array of fixed size of any object - any - Equivanlent to Object type in Java - object - Used to represent any non-primative data types - void - Similar to Java in that it means a function can return nothing, but a variable can also be set to void Take the below code for example ``` export class AppComponent { title = 'ExploringTypeScript'; readonly myNumber: number; someMethod(): void { let anotherNumber; const aThirdNumber = 1; anotherNumber = 2; } } ``` - Variables declared at the method level must have the `let` or `const` keyword - As in JS you don't need to declare the type, but once a variable is assigned to a type it cannot be changed - By default all class-level variables are mutiable, but this can be changed with the `readonly` keyword ### Working with Arrays - `myArray.slice(, )` returns an array from start index up to but not including end index - `myArray.splice(, `)` remove elements in array - `myArray.pop()` removes and returns the last element from the list - `myArray.push()` add element to the end of the list ### Loops ``` for (let i = 0; i < 10; i++) { console.log(i); } for (let next of myArrray){ console.log(next); } ``` - Be careful not to use `in` instead of `of` above, that will fetch the indices rather than the values - In the above, you could change `next` to the `const` modifier, as it never changes within the loop. But `i` could not be changed to `const` as the values changes throughout the loop. # Classes and Objects Because TypeScript is compiled to JavaScript classes don't actaully exist at runtime. - JavaScript's concept of an Object is a set of key-value pairs. `let myObject = {firstname: 'Bob', age: 20}` - These also exist in TypeScript, but classes are far more powerful. - Also, unless there is some sort of biussness logic involved, getters and setters are pointless because anyone can access them. Unlike in Java, just make your variables public - You also cannot have multiple constructors, even with different parameters. Instead you can have Optional parameters - Also unlike Java, multiple classes can exist in one file. ``` export class Book { title: string; author: string; price: number; readonly id: number = 1; constructor(author: string, title?: string) { this.author = author; if (title) { this.title = title; } } } ``` - Enums also exist, and they are treated as arrays - Values 0 to n are automatically assigned to each entry, but this can be changed - Also the looping behavior changes if you set it to custom values ``` enum SubjectArea { ART, HISTORY, SCIENCE, LITURATURE } printArrays(): void { for (const subject in SubjectArea) { if (true) { // the if statement just surpresses a warning console.log(subject); } } // output: 0, 1, 2, 3, ART, HISTORY, SCIENCE, LITURATURE const enumArray = Object.keys(SubjectArea); for (const value of enumArray.slice(enumArray.length / 2)) { console.log(value); } // output: ART, HISTORY, SCIENCE, LITURATURE } export enum SubjectArea { ART = 'Arts and Shit', HISTORY = 'History', SCIENCE = 'Science and Math', LITURATURE = 'English' } printArrays(): void { let label; for (const subject in SubjectArea) { console.log(subject); console.log(SubjectArea[subject]); if (SubjectArea[subject] === 'History') { label = subject; } } let label2 = Object.keys(SubjectArea).find( it => SubjectArea[it] === 'History' ); } ``` ## Methods and Functions `methodName(paramName: paramType): ReturnType` - TS methods are public by default, use the `private` attribute to change that - If a class contains methods, during runtime they will not be availble from the console as all instances of classes are converted to generic JS objects. You could create a function to convert the object to JSON, for ex: ``` export class User { id: number; name: string; getRole(): string { return 'standard'; } static fromHttp(user: User): User { const newUser = new User(); newUser.id = user.id; newUser.name = user.name; return newUser; } } ``` ``` this.dataService.getUser(13).subscribe( next => { console.log(next); console.log(typeof next); let user: User = next; console.log(user) console.log(typeof user) let user2: User = next as User; console.log(user2) console.log(typeof user2) let user3: User = User.fromHttp(next); console.log(user3); console.log(typeof user3) // this will only work for users created from the created method console.log(user3.getRole()) }); ``` Output: ``` { id: 13, name: "matt" } object { id: 13, name: "matt" } object { id: 13, name: "matt" } object { id: 13, name: "matt" } object standard ``` # Reminder: [JavaScript SUCKS](https://github.com/denysdovhan/wtfjs) JavaScript is not an 'opinionated' langauge, meaning there are a million ways to do the same fucking thing with no reccomendation on how to optimize. Ex: ``` console.log(`To buy this book it will cost: ${myBook.priceWithTax(.2)} dollars`); console.log('To buy this book it will cost: ' + myBook.priceWithTax(.2) + ' dollars'); console.log('To buy this book it will cost: ', myBook.priceWithTax(.2), ' dollars'); ``` All do the same thing. Notice the backticks instead of quotes in the first. - Actaully the last console statement above would print an Object in JSON form. If you're ever debugging and keep seeing Object object, try switching to commas. Also filtering can be done in different styles: ``` const oddNumbers = numbers.filter( num => { return num % 2 === 1; } ); const evenNumbers = numbers.filter( num => num % 2 === 0 ); ``` But by far the most mind-bogglingly stupid feature of JS is eqaulity. == Abstract eqaulity === Strict eqaulity The short story is always use Strict eqaulity. As abstract eqaulity will attempt to cast parameters to the same type before comparision. # Debugging and Testing Note for full Intellij debug compatabillity you must use Google Chrome. It's also sort of a hassle to configure linux for tests the first time; ensure `CHROME_BIN` env variable is set to chromium, or add a [firefox config](https://developerslogblog.wordpress.com/2019/03/19/how-to-fix-no-binary-for-chrome-browser-on-your-platform/) to Karma.js ## Debugging (In Intellij) - You can create break points, but to run the you need to add a debug configuration. Go to 'Edit Configurations...', then find JavaScript Debgger, there is a default Angular config ## Testing - The CLI generates tests ending in .spec.ts to allow for test-driven development - Like JUnit, tests are run independently - Run `ng test` in the console to run every test method ``` // Set up testing eviornment fdescribe('DataService', () => { let service: DataService; beforeEach(() => { TestBed.configureTestingModule({}); service = TestBed.inject(DataService); }); // tests begin with it it('should be created', () => { expect(service).toBeTruthy(); }); // focused test fit('addBook increases size of books', () => { const book = new Book(); const before = service.books.length; service.addBook(book); expect(service.books.length).toBeGreaterThan(before); }); }); ``` - To run 'focused' tests you add the letter f to the test class and method you want to be run. - There are many features similar to JUnit and Mockito, such as service mocking and monitoring - A fixture is sort metadata that sits above the component when its created in the testing environment - It's the only way to reference a Service called by Dependecy Injection # Angular Environments Angular environment variables are store in a folder under src/ called environments in files environment.ts and environment.prod.ts for testing and production. It contains key value pairs. We can import the environment for access to all these variables. **NEVER import environment.prod.ts.** Import environment.ts To run Angular with production enviornment: `ng serve --prod` which is a shortcut for `ng serve -c production`(Although in actual deployment we would not use the Angular server) Angular.json tells the app where to get production and regular environment variables, and can even replace files when certian environments are activated It's a good idea to have at least 3 enviornments; One for Production, for development or localhost, and a local version that has data stored internally. # Building a Site ## Bootstrap - One of the most useful tools for front end design is Bootstrap. It can be installed with: `npm install bootstrap jquery popper.js` - The file Angular.json contains where to find certain elements of the application, such as the Bootstrap file. - For example: ``` ... "assets": [ "src/favicon.ico", "src/assets" ], "styles": [ "src/styles.css", "node_modules/bootstrap/dist/css/bootstrap.min.css" ], "scripts": [ "node_modules/jquery/dist/jquery.min.js", "node_modules/popper.js/dist/umd/popper.min.js", "node_modules/bootstrap/dist/js/bootstrap.min.js" ] }, ... ``` This would apply the css in styles.css to and node modules every page in the application ## Routing Basics - In app.module.ts: ``` const routes: Routes = [ // The extension of the URL, and what component or action should be loaded { path : 'admin/users', component : UsersComponent } ]; @NgModule({ declarations: [ AppComponent, MenuComponent, CalendarComponent, RoomsComponent, UsersComponent ], imports: [ BrowserModule, // It is nessecary to add this module with the routes // It never changes, cerimonial code. RouterModule.forRoot(routes) ], providers: [], bootstrap: [AppComponent] }) export class AppModule { } ``` Then in app.component.html: ```
``` router-outlet will be replaced with whatever component it finds in the router module with the given URL - The wild card symbol in routing is `**`. So to set up a 404 page use: ``` // Note: It's usaully production standard to put these in a seperate file // called app.routing.module.ts const routes = [ { path : '', component : `HomeComponent }, { path : '404', component : PageNotFoundComponent }, { path : "**", redirectTo : '/404' } ]; ``` The wild card must always come at the end ## Making Links work with Routing - The problem with the above is that the links perform a GET request on the server, reloading the entire Angular application every time. - Angular is intended to be a single page application - Solution: Remove all href tags that link to a server and replace them with a click event function. - This requires the use of the Routing package from @angular/routing, and is added to the constructor In the menu.html: ``` ... Rooms ... ``` In the menu.component.ts class: ``` @Component({ selector: 'app-menu', templateUrl: './menu.component.html', styleUrls: ['./menu.component.css'] }) export class MenuComponent implements OnInit { constructor(private router: Router) { } ngOnInit(): void { } navigateToRoomsAdmin() { // navigate to /admin/rooms this.router.navigate(['admin','rooms']); } } ``` ## Routing for Sub-Components - To have a url that changes within an application we use yet another library named ActiveRouting ``` rooms: Array; selectedRoom: Room; constructor(private dataService: DataService, private route: ActivatedRoute) { } ngOnInit(): void { this.rooms = this.dataService.rooms; // inspect the URL to see if there is a parameter on the path this.route.queryParams.subscribe((params) => { const id = params['id']; if (id) { // cast a variable to a number using + this.selectedRoom = this.rooms.find( room => room.id === +id); } }) } ``` # Models and Views - If we want to store data so users can see it later, it must be connected to a backend - Spring, ExpressJS, RubyOnRails, etc. - When the data arrives from the backend (the Observable) we create an event to contain it in an array. - For the above reason we use getters and setters of type Observable ``` private rooms: Array; private users: Array; getRooms(): Observable> { return of(this.rooms); } getUsers(): Observable> { return of(this.users); } ``` Then in the ngInit function we subscribe to that event ``` ngOnInit(): void { this.dataService.getRooms().subscribe(next => this.rooms = next ); } ``` # Pipes Pipes allow us to change the way something is displayed, such as a date `selectedDate = new Date();` `

The selected date is {{selectedDate | date:'yyyy-MM-dd'}}

` Check out some other pipe usages in the [documentation](https://angular.io/guide/pipes) The alternative to the above would be ``` ngOnInit(): void { const date: string = formatDate(this.selectedDate, 'yyyy-MM-dd', 'en-US'); } ``` You could also specify the locale this way. But pipes are a pretty cool feature of Angular. # Forms So far we've only looked at static website design and reading data. Forms allow users to input data. There are two different ways to do forms in Angular Template-driven and Reactive. Also here's a cheatsheet on types of databinding in Angular, which i will go into more detail on later: [![](https://bookstack.mitchellhenschel.com/uploads/images/gallery/2022-04/scaled-1680-/image-1650151620581.png)
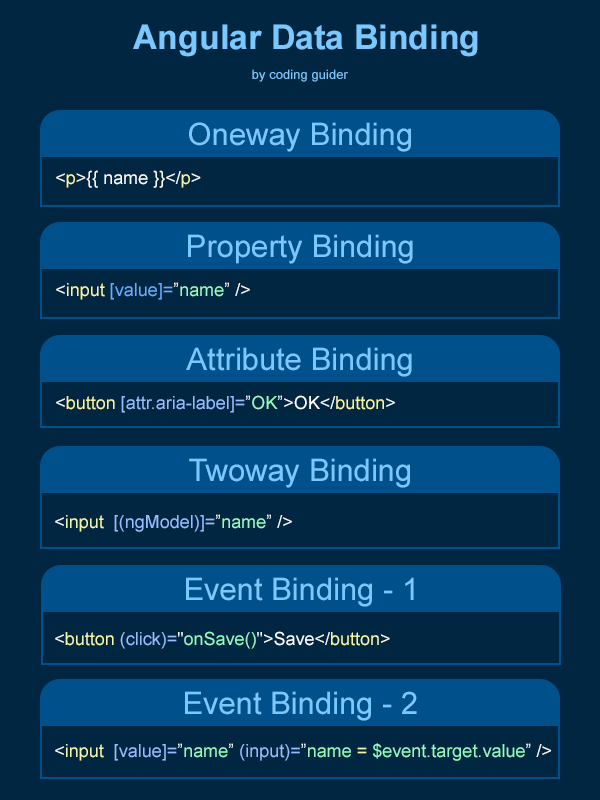
](https://bookstack.mitchellhenschel.com/uploads/images/gallery/2022-04/image-1650151620581.png) # Template-Driven Forms - Template driven forms are the easier of the 2 to understand. The idea is pretty straightforward: - We use an HTML element, such as <input> and create variables in the backing typescript file to bind to the elements. - So as the value in an input changes the typescript variable is automatically updated - We don't actually submit the form to a server, but instead have a submit button which will be bound to a method in the typescript file that can read the variables to get the form's values - Import the `FormsModule` in app.module.ts to interact with forms in different template driven ways ## Template Form Validation - Adding the HTML required tag will enable dynamic class processing on the field for some nice CSS visual cues. Ex: ``Now when loading the page we see the following classes on that field when it is left blank: ![4225e7e04d64a2cb1b977f203b437cca.png](:/4ba3ea5fabb74fecaf6807ae16b5dd47) - There are 2 styles of CSS Angular uses on form validation, ng-valid and ng-invalid, to indicate whether the form element passes validation. - Other control styles: - ng-touched / ng-untouched - Tells whether user has touched the element - ng-pristine / ng-dirty - Tells whether the value has been edited - We can change the behavior of these css styles in the css file ``` // When the input box is invalid // and has been touched change border to red input.ng-invalid.ng-touched { border: 1px solid #f00; } ``` - We can also add template references so we can check for errors across a form or model ```
... ``` # Reactive Forms - Requires `ReactiveFormsModule` imported in app.module.ts - We create an Object in the typescript that is bound to the HTML ``` roomForm = new FormGroup({ roomName : new FormControl('roomName') }); ``` - We have an HTML form that has some controls ```
``` - To get the data into the forms we use a patch value which allows us to take each of the labels and provide a value for it ``` ngOnInit(): void { this.roomForm.patchValue({ roomName : this.room.name, location : this.room.location }); } onSubmit(): void { this.room.name = this.roomForm.controls['roomName'].value; this.room.location = this.roomForm.value['location']; // TODO: Call a method in the dataService to save the room } ``` - We can inject the FormBuilder dependency into the constructor and use it to remove the patch values and form controls we added manually. ``` constructor(private formBuilder: FormBuilder) { } ngOnInit(): void { this.roomForm = this.formBuilder.group({ roomName : this.room.name, location : this.room.location }); for (const layout of this.layouts) { const layoutCapacity = this.room.capacities.find( (lc) => lc.layout === Layout[layout]); const initialCapacity = layoutCapacity == null ? 0: layoutCapacity.capacity; this.roomForm.addControl(`layout${layout}`, this.formBuilder.control(initialCapacity)); } } ``` - And then the HTML can be simplified ```
``` - And validation is very simple in reactive forms. Angular gives us an object type called a validator ``` this.roomForm = this.formBuilder.group({ roomName : [this.room.name , Validators.required], location : [this.room.location, [Validators.required, Validators.minLength(2)]] }); ``` # Connecting to a REST Endpoint ## Choosing a Backend - The default data format is JSON, which can be used with pretty much any backend. - Java Spring uses JSON by default - Python Flask can be configured for JSON with the Flask-JSON library - The api needs to return a text JSON data via HTTP GET for specified endpoints - Here's an example route setup:
HTTP VERBURLAction
GET/api/rooms/Get All Rooms
GET/api/rooms/123Get the room with id 123
POST/apt/roomsAdd a Room
PUT/api/roomsUpdate a Room
One important thing before we get into accessing REST api from angular: Never store plaintext passwords in Angular. Since all Angular code is run through the browser it wouldn't be hard to crack. ## Connecting Angular - First thing to do is import `HttpClientModule` from `@angular/commons` in app.module.ts - Then we can import HttpClient into the constructor and use that to perform HTTP calls ``` constructor(private http: HttpClient) { console.log(environment.restUrl); } getUser(id: number): Observable { return this.http.get(environment.restUrl + '/api/users/' + id); } ``` The get method above accepts a generic type as a hint to the compiler. getUser is actually returning a JS Object with fields that match the user class, but it's not actaully an instance of a User. ### Configuring CORS - Of course, it's never as easy as that. If we tried to run the above service method we would get an error something like: `[your-host]/api/users/[id] has been blocked by CORS policy: No 'Access-Control-Allow-Origin header is present'` - This means the server was reached but the reply was blocked. - CORS is a security policy implemented by browsers to protect users against what are known as 'hijacking attempts' - Basically JavaScript calls a server to get data to display on the page. As long as it comes from the same server as the JS, we're OK. But if the call is to a different server (called a **cross-origin request**) the request is blocked. - To allow requests to different servers we'll need to enable **Cross-Origin Resource Sharing** to give explict permission - Also the port number is enough to define a unique server. Eg. localhost:4200 and localhost:8080 are concidered different servers - CORS is enabled and configured on the Backend - The following example is using Java Spring, but this should exemplify the fundemental idea for any backend. ``` @Configuration public class CORSConfig implements WebMvcConfigurer { @Override public void addCorsMappings(CorsRegistry registry) { registry.addMapping("/api/**") .allowedMethods("GET", "POST", "PUT", "DELETE") .allowedOrigins("http://localhost:4200"); } } ``` ## Pre-Processing REST Data You could put all the preprocessing code in the dataService class subscription within the ngInit method, but that can lead to sloppy code. Instead use the pipe method within the dataService class function which is called for the same effect. In the below example we create a JSON type user from the User object recieved from the api ``` export class User { id: number; name: string; static fromHttp(user: User): User { const newUser = new User(); newUser.id = user.id; newUser.name = user.name; return newUser; } } ``` ``` // some.component.ts ngOninit { this.dataService.getUser(13).subscribe( next => { console.log(next); console.log(typeof next); console.log(next.getRole()) }); } ``` ``` //data.service.ts getUser(id: number): Observable { return this.http.get(environment.restUrl + '/api/users/' + id) .pipe( map( data => { return User.fromHttp(data); }) ); ``` ### Dealing with Slow and Unresponsive Connections Sometimes the data will not be available right away. In this case it would be nice to display something like "Loading, please wait." To do this we create a boolean in the typescript file for the component loading the data ``` message = "Loading... Please wait." loadingData = true; ngOnInit(): void { this.dataService.getRooms().subscribe(next => { this.rooms = next; this.loadingData = false; }); } ``` And then we can query that parameter from the HTML ```
{{message}}
``` ### But what if the entire backend is down? We can add an additional parameter to the data service to catch errors. ``` message = "Please wait... getting the list of rooms" ngOnInit(): void { this.dataService.getRooms().subscribe(next => { this.rooms = next; this.loadingData = false; }, (error) => { console.log('error', error); if (error.status === 402) { this.message = "Sorry - payment is required to use this application." } else { this.message = "Sorry, something went wrong. Please try again later."; } }); ``` For helpful error messages, make sure you properly set the return status code from the back end. Then you can customize the response based on the status code. By default a nonresponsive server returns status code 0 to the browser. ### Retrying on error The best way to do this is by creating a counter and recursively calling a load data function. ``` reloadAttempts = 0; loadData() { this.dataService.getRooms().subscribe(next => { this.rooms = next; this.loadingData = false; }, (error) => { console.log('error', error); if (error.status === 402) { this.message = 'Sorry - payment is required to use this application.' } else { this.reloadAttempts++; if (this.reloadAttempts <= 10) { this.message = 'Sorry, something went wrong. Trying again...'; this.loadData() } else { this.message = 'Sorry, something went wrong. Please contact support.' } } }); } ``` ## A Common Bug Say you save some data and it redirects to the view page. The data might not be immedatly available if there is a delay on the backend, so the console will get an error like 'Object is null'. To prevent this we can use the null check op in TypeScript: ```
id{{ room?.id }}
name{{ room?.name }}
location{{ room?.location }}

This room can accomodate:

{{ layoutCapacity.layout }}{{ layoutCapacity.capacity }}
``` So it will only display if the variable is not null. Note that this is one of the few situations to use this, it's generally not good practice. ## Confirming Action To confirm a delete, update, etc. It is very simple to accomplish in Angular ``` deleteBooking(id: number): void { const result = confirm('Are you sure you wish to delete this booking?'); if (result) { this.message = 'Deleting data...'; this.dataService.deleteBooking(id).subscribe( ... ``` ## Pre-Fetching Data and Using Resolvers Concider the following component code for a calander app: ``` ngOnInit(): void { this.dataService.getRooms().subscribe( next => this.rooms = next ); this.dataService.getUsers().subscribe( next => this.users = next ); const id = this.route.snapshot.queryParams['id'] if (id) { this.dataService.getBooking(+id).subscribe(next => { this.booking = next; this.dataLoaded = true; this.message = ''; }); } else { this.booking = new Booking(); this.dataLoaded = true; this.message = ''; } } ``` We have 3 different data services making calls asyncrounsly. This could lead to problems when the page is loading, as the users/rooms might be unavailable when the booking is loaded. To solve this we could nest each data service call within the `next` block or increment a counter, but this makes the code syncrounous and slows down the user experience. The solution is to create a resolver. A resolver is an object which resolves an observable. The resolver does the subscribing and then waits for the data to become available. In the above case we extract the subscription component for users and rooms from the calander component and add them to two new services: prefetch-rooms.service.ts: ``` import { Injectable } from '@angular/core'; import {Observable} from "rxjs"; import {Room} from "./model/Room"; import {Resolve} from "@angular/router"; import {DataService} from "./data.service"; @Injectable({ providedIn: 'root' }) export class PrefetchRoomsService implements Resolve>>{ constructor(private dataService: DataService) { } resolve() { return this.dataService.getRooms(); } } ``` prefetch-users.service.ts ``` ... Resolve>>{ constructor(private dataService: DataService) { } resolve() { return this.dataService.getUsers(); } } ``` Then in app.module.ts we add the following to the routes: ``` const routes: Routes = [ { path : 'editBooking', component : CalendarEditComponent, resolve : {rooms : PrefetchRoomsService, users : PrefetchUsersService}}, { path : 'addBooking', component : CalendarEditComponent, resolve : {rooms : PrefetchRoomsService, users : PrefetchUsersService}}, ... ``` So now when we navigate to addBooking or editBooking the resolvers are going to be set up so our data is available within the route, although it is hidden. Now we can extract the data into the edit-calander.component.ts as follows: ``` constructor(private dataService: DataService, private route: ActivatedRoute, private router: Router) { } ngOnInit(): void { this.rooms = this.route.snapshot.data['rooms'] this.users = this.route.snapshot.data['users'] const id = this.route.snapshot.queryParams['id'] if (id) { this.dataService.getBooking(+id) .pipe( map (booking => { booking.room = this.rooms.find(room => room.id === booking.room.id); booking.user = this.users.find(user => user.id === booking.user.id); return booking; }) ) .subscribe(next => { this.booking = next; this.dataLoaded = true; this.message = ''; }); } else { this.booking = new Booking(); this.dataLoaded = true; this.message = ''; } } ``` # Securing an Angular Application Security is constantly evolving. You'll need to do your own research on the specific vulnerabilities of your application. However, the following explains fundamental security services provided by Angular. Before we move on understand the difference between the folowing two terms: **Authentication**: Validiating a users credentials to access a system or part of a system **Authorization**: Checking if a user has access to a restricted system. [![](https://bookstack.mitchellhenschel.com/uploads/images/gallery/2022-04/scaled-1680-/image-1650149639971.png)](https://bookstack.mitchellhenschel.com/uploads/images/gallery/2022-04/image-1650149639971.png) # [Json Web Tokens](https://jwt.io/) JWT Tokens are used to store an active session after a user has been authenticated. Using JWTs there is no need to store the username and password directoly in memory. Everything needed for the server to authenticate and authorize exists in memory, and every token can expire after a set amount of time. A typical JWT is a long string seperated into 3 parts seperated by the '.' symbol. `eyJhbGciOiJIUzI1NiIsInR5cCI6IkpXVCJ9.eyJzdWIiOiIxMjM0NTY3ODkwIiwibmFtZSI6IkpvaG4gRG9lIiwiaWF0IjoxNTE2MjM5MDIyfQ.SflKxwRJSMeKKF2QT4fwpMeJf36POk6yJV_adQssw5c` The **Header** contains 2 parameters: The algorithm used to decode the token and the token type, which in our case should always be "JWT" ``` { "alg": "HS256", "typ": "JWT" } ``` Next is the **Payload** of the token, it is encoded in Base64. We can put anything we'd like into here. Never put sensitive information like passwords in here, as it can easily be decoded. ``` { "sub": "1234567890", "name": "John Doe", "role": admin } ``` Finally the **Signature**, which is generated from the payload and header. Note it is encoded first using the header-defined algorithm, then Base64, so decoding it must be done in reverse order. ``` HMACSHA256( base64UrlEncode(header) + "." + base64UrlEncode(payload), { my-256-bit-secret } ) ``` A private key stored on the server side is used to sign the token so we can be sure only our server issued the token. ## Server Side JWT Usage The first step is choosing your method of authentication. Whatever method of authentication you use on the backend is up to you. A few different types of authentication include: **Basic Auth:** Comparing plaintext username/passwords directly on the server. Straightforward but remember it is bad practice to hard code any passwords into the code. If using this method I would recommend storing the hashed password in a relational database. **LDAP:** Lightwieght Directory Acess Protocol is used for directory services authentication. Connect to an external server which holds credentials. Pretty complicated to set up but very secure when done right. **OAuth :** OAuth/OAuth2 is an open standard for securing access to APIs. Connect to a existing third party login provider such as OKTA, Google, Facebook, etc. Some configuration is required and there is a bit of a learning curve, some api documentations are better than others. On the backend implement the dependecies for whichever auth service you choose, and also any JWT dependencies that are needed. The next steps are as followed: 1. Write a method to generate a Token, choose what fields you want in the payload. 2. Choose method of authentication. RSA encrytption requires a public and private key. It is ok to have a new Key generated every startup The below is written in Java and I'm not going into specifics on the classes used here because there are already a lot of good guides out there. I into more detail on RSA encryption and signing in my Ktor [tutorial](https://bookstack.mitchellhenschel.com/books/ktor/page/signing-json-tokens-with-rsa) ``` private RSAPrivateKey privateKey; private RSAPublicKey publicKey; @PostConstruct initKeys() throws NoSuchAlgorithmException { KeyPairGenerator generator = KeyParGenerator.getInstance("RSA"); generator.initialize(2048); KeyPair keypair = generator.generateKeyPair(); privateKey = (RSAPRivateKey) keypair.getPrivate(); publicKey = (RSAPublicKey) keypair.getPublic(); } public String generateToken(String name, String role) { ... ``` # Securely Storing the JWT Token Returning the JWT Token as a HTTP respsonse puts the token in local javascript memory. This puts the application at risk of Cross-Site-Scripting. The production standard way of storing tokens are SSL-encrypted HTTP-only cookies.